Tuesday, March 31, 2009
EMBELLISHMENT EXTRAVAGANZA
I have great news! For all of you who love embellishment as much as I do, I am leading a five day workshop March 2010 at Quilting Adventures in Texas. Make plans to embellish with me now!
Love embellishments, but don’t know where to start? Then this embellishment workshop is for you!
I love embellishments, especially ‘all things shiny’ and uses them expertly in my work. Learn techniques in a relaxed, hands-on workshop. I will guide you in the creative use of beads, fabric, foil, paintstiks, buttons, threads and embroidery to fashion your own special quilt.
You will also learn an easy way to form a bow, create texture with ribbons, plus construct folded ribbon roses.
This workshop is like having a week of private lessons from a Master Embellisher! Once you learn the techniques, you will be able to create your own embellished ‘masterpieces’ on any textiles from quilts to wall hangings and garments.
There will be plenty of time to work on small projects. You will be surprised at how quick and easy the smaller ‘Eye Candy’ and ‘Bead Candy’ quilts are to make. As your creativity flows, you will be dazzled by the results!
Saturday, March 28, 2009
Scrap Quilts and their makers!
Sally Schneider: A specialist in scrap quilts and built-in borders, author of nine books. Her lecture was wonderful! She talked about scrap bags, or boxes, or barrels full of bits and pieces. What to do with these fabrics, how to purchase fabrics, prepare scraps so they are ready to use when you want to sew. She also explored the elements of a good scrap quilt and some fun ways to put your blocks together, including pieced sashing and use of easy alternating blocks.
Bonnie K. Hunter is passionate about quilting, focusing mainly on scrap quilts with the simple feeling of “making do. She has a wonderful system to help you use your scraps! She talked about how to organize your scraps and leftovers for easy accessibility to make scrap quilts. She uses her scraps, doesn't save them. Her talk helps inspire quilters to organize their scraps and start turning them into beautiful quilts.
Thursday, March 26, 2009
Road Trip
Sometimes you just need to invite a friend and take a road trip. Time to spend with friends and visit a quilt show and a shop or two.
Last Saturday I visited the Quilters Anonymous Quilt Show at the Evergreen State Fairgrounds in Monroe Washington. Great show with lots of quilts! http://www.quiltersanonymous.org/
And of course many merchants with lots of temptations!
We stopped at a new to us quilt shop, The Quilters Garden in Duval WA on the way home. If you are ever in the area it is worth a look! Be sure to ask about the shop mascots Harry Otter and Ron Weaslie! http://www.duvallquiltshop.com/
Monday, March 23, 2009
California Here I Come!
Sign-ups have begun for Quilt Festival in Long Beach July 22-26, 2009.
Here is the link to order the catalog http://www.quilts.com/sqf09/info/2009Catalogue.pdf
I'll be there with some of my favorite workshops!
Thread Toppings
Thread may have once been considered just a basic necessity of sewing, but happily it’s now available in so many luscious colors and types that it has become sheer pleasure to use. Steering your way through the sea of threads available can be a time consuming and somewhat daunting task. I will guide you through the learning process so your sewing will become fun and fancy.
Fantastic Fabric Foiling
Bring your projects to life with instant glitz and shine. Foiling on fabric is easy, fun and permanent. This informative hands-on workshop is for both traditional and non-traditional quilt and clothing makers.
Paint Stick Magic
Make elegant fabric with the look of airbrushing! Paint sticks applied to silk or cotton are simple, fun and permanent. This revealing hands-on workshop is for both quilt and clothing makers.
Simple Surfaces
Learn all about paint sticks and foiling on fabric. Applying foil or paint sticks to silk or cotton is easy, fun and permanent. This informative hands-on workshop is for both traditional and non-traditional quilt and clothing makers.
Beads are a Blast!
Beads are a fun addition to many quilts and garments. Come learn how to use beads. Learn what to look for when you shop, how to sew those little beads that add so much to your designs. I will share with you design ideas, handling tips & sewing techniques.
Be the first to wish me Happy Wednesday, or what ever day it is, receives a gift form me!
Thursday, March 19, 2009
The Mystery of Quilting Designs
As I work on my next piece it occurred to me that I think a lot about the quilting design. Here are some thoughts on how to choose a design.
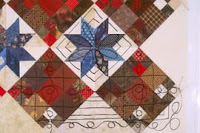
An un-quiltied top
Questions
1. Do I intend to hand or machine quilt? Knowing the method in advance will help you select a design that is most easily accomplished with that method.
2. How much time do I have for this project? Some designs are faster to stitch than others. If you know time is limited, design choices will be limited, too.
3. What is my skill level? If you are proficient at machine quilting, your design choices are much greater than if you are just learning. A novice machine quilter might choose designs which involve the walking foot (or even-feed feature) that require only minimal use of free-motion.
4. What use will this quilt serve? Heirloom quilts, of course, deserve much more intricate quilting designs than a functional. Wall quilts that will never be washed can have a much more open design, with widely spaced lines.
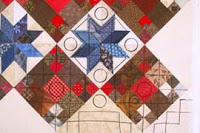
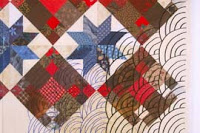
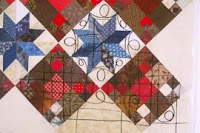
Four different design possibilities - A piece of Duralar purchased at the art supply store, be sure to apply tape to the edges so you can see the edges. And a Vis-a-Vis water based pen for drawing potential designs. The pen is easy to erase to try another design.
Goals
1. The amount of quilting should be adequate to hold the three layers together. The function of the quilt is important: a quilt that will be handled a lot needs more quilting than one that will simply hang on the wall.
2. The quilting should be uniform across the quilt surface. Quilting looks best when the quilting lines are evenly distributed across the surface.
3. The quilting design should complement the quilt top. Often, it is difficult to visualize whether or not a design will “look good” stitched through the layers. Experience observing the quilting on other quilts will help; pay careful attention to the ways quilters have finished their pieces next time you go to your guild’s show.
Basic Categories of Designs
All quilting designs consist of either lines, shapes, or a combination of both. The key when designing is to consider as many variations as possible before settling upon the design to stitch.
Play around with straight lines; then try curved lines. Vary the length of the lines; see what you can do with short lines then with long lines. Change the direction of the lines from up-and-down to horizontal then to diagonal. Keeping in mind the maximum spacing allowed for your quilt batt and the quilt’s function, try widely spaced lines then audition them at many other dimensions.
When working with shapes, size is important. The size of the shape should look right in relation to the size of the patch or patches over which it is stitched. Play around with placement of the shape. For a traditional treatment, place a shape in the center. For an innovative look, try placing the shape off-center. As with lines, shapes can be angular or curved. Audition shapes of both characters before selecting the one that looks right to you.
Conclusion
The ideal approach to quilting design is to think “what if.” What if I tried a curved design instead of a straight one? What if I tried an informal design of allover wiggly lines instead of placing shapes in specific places? What if I made this shape bigger or smaller? What if I used this shape, or that shape, or another one? What if I paired the shape with a grid, a meander, or another shape?
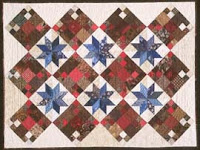
American Pie 'quilted'
Tuesday, March 17, 2009
Clark County Quilt Guild
My visit to the Clark County Quilt Guild was wonderful! The quilters were very welcoming! I know that they would welcome you too.
Their quilt show is in a couple of weeks. Here are the details:
April 2-4, 2009
Thursday and Saturday 10-5
Friday 10-6
34th Annual Clark County Quilt Show
"Treasures of the Northwest"
Vancouver Church of Christ
9019 NE 86th Street
Vancouver, WA 98662
www.clarkcountyquilters.org
360-433-2412 (after 6 PM)
Wednesday, March 11, 2009
Tips for Machine Piecing
I have been sitting behind my sewing machine this week piecing my next creation and thinking about what makes a quilt successful. The first in a long line of things is piecing accuracy. Here are my tips for piecing by machine.
1. Gray and beige thread; most of my piecing is done with either dark gray and beige or light gray and beige. I put the gray thread in the top and the beige in the bobbin. I find that should I need to reverse sew I know right away to cut the top ‘gray’ thread and pull the bottom ‘beige’ thread.
2. Sew with smaller thread; I use a machine embroidery thread or one of the newer threads made for piecing like Superior Threads ‘Masterpiece’.
3. Use a sharp needle and change it often; I prefer to use a smaller needle Sharp/Microtex size 70/10. Other good choices are Sharp/Microtex size 80/12, a size 75/11 quilting needle or a Jeans/Denim size 70/10 or 80/12.
4. Press seams open; I press as many seams open as possible. Now I’m not totally crazy, if it is easier to have seams pressed one way or the other I do so, but I press seams open most of the time.
5. Use ¼” foot with guide if possible; Many machines have a ¼” foot available. I prefer the foot with the guide. I need a ‘wall’ that allows the fabrics to ride along. If you want to try the guide idea, use either layers of masking tape or moleskin and place it exactly ¼” from the needle.
6. Use the single stitch throat plate; The normal throat plate has an oblong hole which allows the machine to eat the thread tails or fabric.
7. Change needle position; Even though I use a ¼” foot, I still feel that in order to get a scant ¼” seam, I move the needle one very small step to the right. Be sure to check and make sure the needle won’t break.
8. Chain piece; I piece as many pieces as possible one right after another. Saves time and thread.
9. Even seam width the whole length of the seam: Use a stiletto to guide the last little bit of a seam if necessary to get an even seam width.
10. Starch: I starch a lot. I prefer the old fashioned liquid starch that I find at a big box store. I mix it half and half starch and water for heavy use. The hardest part of doing this is finding a bottle that likes to spray facing down at the work lying on the ironing board. I prefer this to aerosol cans because it never flakes!
11. Press not iron: I do not want any distortion, so I carefully press and lift, not rubbing back and forth as in ironing.
Thursday, March 5, 2009
Lowell Quilt Festival
Lowell Quilt Festival registrations are now open for the Festival August 5-8, 2009
http://www.lowellquiltfestival.org/Classes/Crust.shtml
I’ll be there with my lecture Quilt Toppings on Friday night, plus these workshops:
The Decorative Thread Experience
Thread may have once been considered just a basic necessity of sewing, but happily it’s now available in so many luscious colors and types that it has become sheer pleasure to use. Steering your way through the sea of threads available can be a time consuming and somewhat daunting task. I will guide you through the learning process so your sewing will become fun and fancy.
Paint, Glorious Paint
The joy of painting onto fabric is that there are so many possibilities and so few rules. This is a time to set free your imagination, pick up brush and play. Apply the same techniques you use in creating the quilt top,—visual trial and error. Play with fabric paints to enrich your fabrics before you begin sewing—or at any time during the process. Use paints to add new designs or dimension to portions of your quilts, making the fabrics uniquely your own. The choices are yours and the magic is waiting to happen.
Simple Surfaces
Bring your projects to life with instant glitz and shine. Foiling on fabric is easy, fun and permanent. This informative hands-on workshop is for both traditional and non-traditional quilt and clothing makers.
Eye Candy Quilts
Eye Candy quilts are stunning mini-quilts that are so much fun to make they should be illegal! They can be finished in practically no time and adding beads, buttons, ribbons, paint, feathers and a myriad of other commonly available materials is so fun and easy that ANY quilter will be dazzled.
See you there.
Melody
Hi All,
I’ll be in Vancouver WA at the Clark County Quilters Guild meeting giving my lecture Quilt Toppings, Thursday, March 12. The two day workshop is Embellishments, etc. I hear it is almost full, but for more information contact Sharron at quiltbrains@gmail.com
Before After
Embellishments, etc.:
Quilters will combine basic blocks, embroidery and "beads, bangles, buttons and bows" to make their own special quilt. I will guide you in the creative use of fabric, buttons, threads and beads. Learn an easy way to make a bow, how to create texture with ribbons and lace and to make folded ribbon roses.
PS Let's celebrate St Pattys early...the first person to wish me Happy St Pattys day gets a green gift from me!
Monday, March 2, 2009
Machine Crazy workshop
This Sunday, March 8, 2009 I will be teaching crazy quilting my machine at QuiltWorks Northwest in Bellevue WA. Sign up at: http://www.quiltworksnw.com/cartgenie/prodList.asp?scat=189&sflag=3&brand=21
Master Crazy Quilting! Create a block by machine while learning the technique of crazy quilting. I will steer you through the sea of threads available to today’s crazy quilters and machine sewers. Learn easy ways to make a bow, how to create texture with ribbons and lace all by machine!
Subscribe to:
Posts (Atom)